I’m at a new internship

Leave a comment

So my REU internship ended in May. Thank you so very much Anthony Salvagno and Steve Koch for the experiences and opportunities you graciously shared with me over the past eight months.

I’m updating my blog/notebook to include my undergraduate and future experiences.

I was accepted for another NSF internship program for the summer. I’m working with some really great people at a UNM Research Center called COSMIAC. I’m updating FPGA/VHDL training materials and learning more about programing FPGAS. I’m really enjoying my time here, and here are some reasons why:

  • Last semester I took ECE 238 – Computer Logic and Design – and fell in love with VHDL and computer logic. This is the field I would eventually like to be working in, so the work I’m doing is really relevant for me.
  • My supervisors are supportive of me and really engaged in my success (just like Anthony and Steve were and still are).
  • I’m going on a little trip at the beginning of August to help train some people at a community college. What better way to learn more about a topic than to teach it.
  • I get to blog about my work.
  • (They also let me work 4 days a week, so I can have long weekends with my children for the summer! )

I’ll post updates about my experiences here.

Final Presentation for REU

Leave a comment

Yesterday afternoon I gave my final presentation for the NSF REU. I’ve posted it on Slideshare for you all to see. It wasn’t real obvious, until I started working on the presentation, how much Anthony and I have done over the last several months. We’ve gotten a lot accomplished!

I have had such a great experience this year that I volunteered to continue coming to the lab this summer. Thankfully Anthony and Dr. Koch aren’t tired of me and agreed to let me stay involved this summer. I hope to be able to work in Koch Lab at least 4 hours a week. I’m interested to see how the e.coli in D2O progresses.

Also, Anthony is really moving and shaking in the Open Notebook Science community. This is really exciting to me.  I’ll be taking my ONS experience with me to my next opportunity…

I’ve been given another NSF internship opportunity, the STEM Talent Expansion Program (STEP), for the summer. [I think that is the right link… the NSF site is down for maintenance until tomorrow night. Let me know if the link isn’t correct]. I’ll be working part-time with Dr. Ramiro Jordan, who seemed open to me keeping an online notebook. Stay tuned for some information about VHDL and circuits.

I am indebted and full of gratitude for all the support and guidance that both Anthony and Dr. Koch gave me this past year. Thank you seems like not enough. Thank you both.

On growing e.coli and becoming an ONS scientist

1 Comment

I’m guessing that growing e.coli might not be all that exciting to most of the world’s population. However, I’m excited because I’ve gotten the opportunity to learn how to do this and Anthony has put his trust in me to do it on my own.

Anthony posted a list of To-Dos for me this week. Today’s task was to start another batch of e.coli. Tomorrow we’ll use this batch to get spectroscopic absorbance readings on samples of 1:10 dilution in DI water, DDW, and 33% D2O. This is what I’ve been waiting for.

Just so you all know, with the exception of last week, everything I’ve done in the lab thus far was when Anthony was here. I’m not sure why, but I was a little nervous last week when I was actually on my own. I shouldn’t have been and I wasn’t today. I’ve taken, and posted, really good notes in my notebook. Today I was glad I did.

I got to the lab ready to start the next culture and discover that not only are we are out of LB broth, there are no autoclaved 50mL triangle beakers that we usually use to mix up this stuff. What we do have autoclaved is a few 150mL cylindrical beakers.

Anthony is busy working on his talk for this afternoon and I didn’t want to bother him and there isn’t enough time for me to autoclave beakers, start new broth (which also requires autoclaving), and make it to Anthony’s talk by 1.

So I improvised.

I used a 150mL beaker, and made 100mL of LB broth using 2g LB broth mixed with 100mL of Dbl processed water (twice the amount from my April 10th recipe).

I measured the LB powder pretty darn close, 2.0008g, poured it into the beaker, added the water and used the magnetic stirrer to get it all mixed up well. I had never actually used the stirrer before, but I watched Anthony and learned a little trick of moving the container around so that the magnet would hit the sides and get all the powder moving.

As I write this, the broth is in the autoclave. I used the same protocol as I wrote about on February 6. Since this is a liquid, it will cook at 250°F for 60 minutes.

I’ll start the broth after Anthony’s talk, before I run off to see Tom Petty and the Heartbreakers later tonight.

Monitoring e.coli growth

1 Comment

Today Anthony and I are tracking e.coli growth over several hours. His post is detailed, so I wont repeat all the nitty-gritty here (I’ll add a link when he posts his notes).

First we took baseline readings using the Thermo Nanodrop 2000C. Then we made three new batches of diluted e.coli from the batch I ‘Koched’ up yesterday, diluted with LB broth in 1:2, 1:5, and 1:10 parts. Then we put the three batches in the incubator at 37º C and every hour took new spectroscopic readings.

During one of our in-between-spectroscopic-reading-times we ran out to lunch. We went to the Guava Tree Cafe… OMG… absolutely delicious. We both had a stuffed Arepa. I had La del Perro and Anthony had Arepa Pabellón. If you live in Albuquerque you have to try this place. If you don’t live here but get a chance to visit, make sure you eat here at least once. You wont regret it.

Growing e.coli on my own

4 Comments

Anthony is teaching lab this afternoon and asked me to start a batch of e.coli… all by myself. At first I was thinking, “Sure, no big deal. I’ve done this several times with you.” Then I got to the lab and got all nervous. Silly me. 🙂

Here is the procedure I followed:

  1. put on gloves – very important not to contaminate myself.
  2. get supplies:
    • 10mL tube and pipette
    • inoculating loop, Green 10 x 1µL
    • autoclaved test tube
    • LB broth
    • agar plate with e.coli – LB Day 2 batch
  3. Remove cover from LB broth and pipette 10mL of broth into test tube.
  4. Re-cover test tube and broth.
  5. Dispose of pipette tube in bio-hazard bin.
  6. Remove parafilm from agar plate.
  7. Using inoculating loop, get a single colony of e.coli on loop.
  8. Put loop in test tube and swirl for a few seconds.
  9. Dispose of loop in bio-hazard bin.
  10. Recover test tube.
  11. Place test tube in incubator at 37 C.
  12. Re-cover agar plate and seal with new parafilm.
  13. Place agar plate and LB broth back in refrigerator.

Everything went smoothly. I didn’t spill or contaminate anything (this is so silly, I feel like the first time I got to ride my bike without my parents watching). We should have some new e.coli tomorrow to use for this week’s experiments.

See you all then!

Yeast, E.coli day 2

3 Comments

After 12+ hours in the incubators we have growth… well almost. Neither one of the yeast agar plates grew anything. However, both the LB broth and LB agar plate grew e.coli, and the YPD broth grew yeast.

So today we did a few things:

  • We set up two new YPD agar plates using starter culture from the YPD broth that we grew last night. One agar plate is in the 24° C incubator and the other is at room temperature.
  • We decided to grow some more e.coli colonies on an additional LB agar plate using starter culture from the LB broth that we grew last night. It is now in the 37º C incubator.
  • We took spectroscopic readings of our samples using the Thermo Nanodrop 2000C. We used 2mL of the YPD and LB broth and then did the same with 2mL of each starter culture.

Baseline Spectroscopy of Yeast and E.Coli

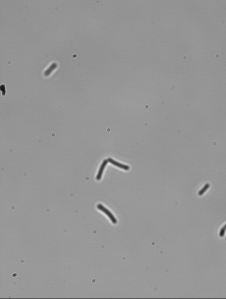
Yeast Picture

E.Coli Picture

Anther round of yeast and e.coli

2 Comments

Today Anthony and I started preparation for DDW and D2O experiments with yeast and e. coli.  Anthony has a few posts about our past growth experiments. Previously we were successful growing both organisms however, we didn’t get into the DDW or D2O phase of the experiments.

The yeast we are using is S. cerevisiae, g160/2d. We are growing three samples. One sample is being grown in YPD broth that is a mixture of 50mL SIGMA Db/processed water and 2.5g of USB YPD Broth (ultrapure). The other two samples are on 100mm YPD Agar plates from Teknova. One plate is in the incubator with the broth mixture at 24 degrees C. The other plate we are leaving out at room temperature.

We are growing two samples of  DH5α™ e. coli. The first sample on a 100mm LB Agar plate (also from Teknova). The second is in an LB broth mixture of 1g LB broth mixed with 50mL of Dbl processed water, both from SIGMA. Both samples are  in the incubator at 37 degrees C.

We made LB and YPD broth by carefully measuring the indicated amount of broth powder using the lab’s Ohause Adventurer SL balance and small weight boats. We then poured the powder from the weight boat into 50mL beakers and added 50mL of water. We then used magnetic stirrers and a hotplate/stirrer to mix both broths. The LB broth was autoclaved.

Tomorrow we should have some samples ready to go. We are planning on first seeing if we can grow deuterium resistant strains of both the yeast and e.coli. After that we will see how the resistant strains fair in DDW.

REU Tour of The National Museum of Nuclear Science & History and CINT

Leave a comment

Linda Bugge, our REU administrator coordinated a wonderful day for all of the REUs yesterday.

We all met at CHTM at 9:30 to carpool to our first destination, The National Museum of Nuclear Science & History. We arrived just in time to watch Modern Marvels, The Manhattan Project. I hadn’t seen the show before today, and was pretty impressed with the what I learned. A few key items that I recall (disclaimer: I am not making any kind of statement here, just recalling facts that I learned today):

  • The project was started in 1939 and cost over two billion dollars (over 30 billion in today’s dollars).
  • There were several, very large, sites built in a very short period of time to facilitate the building of the atomic bombs.The three main sites were Oak Ridge, Tennessee; Los Alamos, New Mexico; and Hanford, Washington. This map shows all the sites.
  • The three methods for obtaining Uranium 235 were all extremely difficult, time consuming, and labor intensive.
  • Most of the work done to obtain Uranium 235 was done in Oak Ridge.
  • Oak Ridge’s energy consumption was 10% of the total US energy consumption during it’s operation.
  • Since Uranium 235 was so difficult to obtain, there was only one bomb (Little Boy) made from this material… and no test bomb was made prior. The first Uranium 235 bomb to ever explode was the bomb dropped on Hiroshima.
  • Plutonium was easier to produce, and was made by a plutonium production reactor at the Hanford site.
  • Because they had plenty of plutonium, they exploded a test bomb on July 16, 1945. Fat Man was dropped on Nagasaki on August 9, 1945.
  • Since that time, war related deaths (U.S.) have declined exponentially.

After that we were free to view the exhibits of the museum at our leisure. At 12 we all got back together and went to Chili’s for a wonderful lunch. Next we headed over to CINT (The Center for Integrated Nanotechnologies) for a tour of the facilities and a few informative presentations by some of the staff.

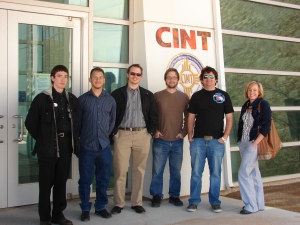
2011/12 REUs outside of CINT

George Bachand was very kind, and took all of us around the facility and explained things as we were walking. The facility is quite large and there is a bunch of research being done. He was very informative, but to be honest, I understood only very little about what we initially saw. We then broke into two separate groups. One group went to tour microprocessors. I went with Wally Paxton’s group to take a look at his Soft and Biological Nanomaterials work.

Wally showed us his lab where he is “developing new strategies for efficient integration of functional molecules, including transmembrane transport proteins, and the means to characterize the action of these exotic molecules at interfaces.” Then we went into an adjoining lab and met another scientist, Nathan who showed us some video he had taken of microtubules.

Nathan had a lot of information for us about his current work and possible future applications for his research. If I understood him correctly, this could possibly, one day in the future, include repairing nerve damage and brain trauma. This was fascinating for me. It seemed similar to the work that Nadia Fernandez-Oropeza is working on. (Nadia is also one of Dr. Koch’s grad students. Anthony and I share a lab with her at CHTM.)

Next we all joined back up to hear from Mark Stevens, who told us about his work as a theorist. Finally Neal Shinn, the Co-Director of CINT, told us about the proposal submission process and life cycle. Basically it works like this:

Anyone who needs help with their research can submit a proposal for use of CINT’s facilities and/or scientists. There are two ways to submit proposals, during their twice a year “call for proposals,” which would provide access to CINT for up to 18 months, or as a “rapid access” submission for time sensitive or short term projects. The proposal should be no more than two pages. About 80% of the proposals submitted get approved. Once approved the only requirement is that the results of your research be published.

After that our day was over. I had a really good time and learned a lot. Many thanks to Linda for all of her efforts putting this day together for all of us.

Water Bears in the Lab

7 Comments

Wow, it’s been almost two weeks since my last post!  It’s almost spring break, and I’ve been studying like mad for midterms. I’ve been in the lab very little the past two weeks. <sad face>

Monday Anthony and I went on a little excursion to the Bosque looking for tardigrade habitats. Read his post here. It was an interesting experience. Anthony had mentioned tardigrades a few months ago. I did a Google search and found lots of interesting information about these little creatures:

Tardigrade (or water bear), the toughest creature on Earth.

  • They are found everywhere in the world, from the Himalayas to the Artic. They live in Hot Springs and Forests.
  • They can survive in extreme environments because they can pause their metabolism and enter a state of suspended animation, called cryptobiosis.When they are in this state they are in a tun.
  • They can survive without water for over 100 years while in tun.
  • They can withstand 1000 times more radiation than any other living creature known.
  • They can also survive in space (without space suites or spaceships).

All in all they are very impressive little critters.

So why were we looking for them? Well, since I’ve been here, all our research on D2O and DDW has been with tobacco and Arabidopsis seeds. We are now moving into the next phase of research, using yeast and e.coli. One day we were talking about this next phase, and Anthony mentioned that it would be cool to see what effects D2O and DDW have on other life forms. Since Tardigrades are so adaptable, we started looking into getting some for our experiments. Since they are found everywhere we decided to go on a Tardigrade hunt.

The following steps are how to find them (taken from Sarah Bordenstein’s page at Carleton College):

  1. Collect a clump of moss or lichen (dry or wet) and place in a shallow dish, such as a Petri dish.
  2. Soak in water (preferably rainwater or distilled water) for 3-24 hours.
  3. Remove and discard excess water from the dish.
  4. Shake or squeeze the moss/lichen clumps over another transparent dish to collect trapped water.
  5. Starting on a low objective lens, examine the water using a stereo microscope.
  6. Use a micropipette to transfer tardigrades to a slide, which can be observed with a higher power under a compound microscope.

Today we started step 2.

Bosque Samples in water, awaiting for Tardigrade extraction

FTIR – DDW, DI, D2O

Leave a comment

Today I ran FTIR spectroscopy on three ages of DDW, two ages of D2O and the four types of DI that Anthony is using in his current DDW5 experiments.

Many thanks to Stephen Myers for training me on the use of the FTIR, and Dr. Sanjay Krishna for providing me with access to the lab and machine. Stephen was in the lab today and was graciously helpful, as always.

As always I started with a scan of the empty cuvette for the background. Today I kept getting a really strange scan image. Stephen took a look and said confirmed that the scan didn’t look quite right. He changed the Bench Set Gain option to autogain, Anthony cleaned the cuvette, and the next scan came out as we expected it should. After we got a correct background we did a comparison of the previous FTIR background (2/2/2012), today’s background with no autogain correction, and the corrected autogain background. We used today’s autogain corrected background scan for all of our scans today.
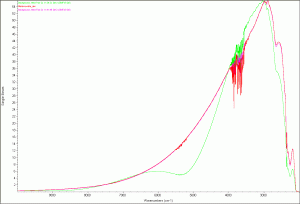
background-old-bad-good

Comparison background scans

For each of the following scans we used the same set up as my previous scans from 2/2/2012, using a quartz cuvette and 3µL of the specified water sample.

My first set of scans were three samples of DDW, each opened on a different date (9/6/2011, 1/17/2012, and 2/16/2012). I expected to see a difference because of possible atmospheric absorption of D2O. What I found was they were all pretty much the same the first scan that I ran. Unfortunately, I messed up the save process and had to re-scan the September and January samples. That scan produced a different result for January as shown in the following figure.
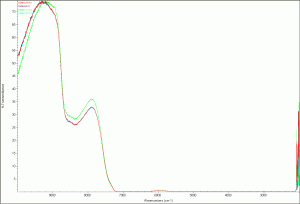
DDW second scan

DDW second scan

DDW (second scan) zoomed image

Next I scanned the four types of DI water Anthony is currently using in his current DDW5 experiment (see link). The four types of DI water are:

  1. DI from the Easypure RoDI (Thermohe) machine in our lab (Ro_DI – purple)
  2. CHTM’s DI (CHTM_DI – Red)
  3. Sigma molecular biology grade water (SMol_DI – light blue)
  4. Sigma double purified water (SDP_DI – green)

The results are surprising. The Sigma double purified water’s scan was slightly different than the other three, which were almost identical. This is certainly something to take a look at.
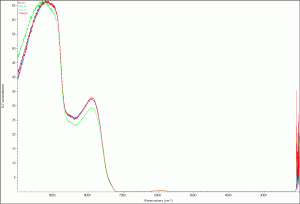
Deionized water scan
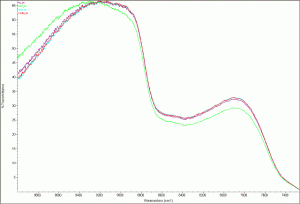
Deionized water - zoomed image

Next I scanned two samples of D2O:

  • a bottle opened on 2/16/2012 (red in the scan image)
  • a bottle opened on 11/1/2011 (blue in the scan image)

This scan also produced differing results, possibly from atmospheric absorption (what we had expected to see with the different aged DDW).

D2O scan

D2O scan zoomed

Finally just for comparison, I opened a new window and opened the scan of the February DDW and D2O, the Sigma double processed, and the Sigma molecular biology grade water just to see how the results compared. Interesting that the DDW and Sigma double purified water are identical. Hmmm…

Comparison of DDW, D2O and both of the Sigma DI scans

I’ve uploaded all the raw data onto FigShare with all the images.

My next project is to read up on water frequency and figure out what all the numbers mean. I’ve found a few papers and a website that will probably help shed some light on my very pretty graphs. I’ve ordered two of the papers from the library and the other information is available online.

Older Entries